
Episode 5: Consent & Subscriptions
TL;DR
- Consent and opt-in management is critical for regulatory compliance, domain health, and deliverability.
- In MCN, you create subscription types and import consent via CSV with email and consent date.
- The consent object is its own separate object in Data Cloud and does not have a native connection to the individual.
- Without creating the relationship between the consent object and the contact point email, you can’t see consent status in your segments.
- Once the relationship is set up, you can build segments that filter for opted-in contacts and understand your true marketable database size.
In this episode, we’ll walk you through how to set up and manage consent using the consent object and subscription model in Marketing Cloud Next (MCN). We’ll cover creating subscription types, importing consent, and the crucial step of connecting the consent object to your data model so you can actually see your marketable database in segmentation.
Let’s get into it!
Why Consent Matters
Many countries already have regulations determining that you can only email people who have consented to your communications. Some countries even require a double opt-in process.
But even for countries that don’t legally require consent, we always recommend using it for domain health reasons. If someone is receiving your emails and they don’t have a way to clearly unsubscribe, they start tagging you as spam. By tagging you as spam, your domain quality goes down, your deliverability goes down, and all of a sudden, you can’t communicate with the people that really matter.
So, whether it’s about avoiding fines or maintaining best practices in marketing, importing your audience properly with the correct consent is essential.
Step 1: Create Subscription Types
The first thing you have to do in MCN is create subscription types. These represent the categories of communications you’ll be sending to your audience.Navigate to your subscription types in MCN. You’ll see any existing types already listed (for example, an “email marketing” subscription type). To create a new one, click New Subscription, enter your subscription name, select the channel, and save.

Step 2: Import Consent
Once your subscription types are created, you need to import your contacts with their consent status. This is done through the consent import feature.Click the Import button, select the channel you want people to be imported into (such as the communication subscription marketing type you created), and set the consent status to opt-in or opt-out.

If you’re importing opt-in contacts, you upload a CSV file that contains the email address and the consent date. As you import it, this gets registered into the system.
Important Caveat When Sending Emails
Now that we have consent data in the system, we can start sending marketing emails — but there is a caveat. You won’t be able to see how many people are receiving the emails initially.
Throughout this guide, we’ve talked about how everything in MCN is built on top of Data Cloud. Everything is an “object”. Your leads and contacts transform into individuals, and individuals transform into unified individuals. Consent is not how you would expect it to be in other marketing automation platforms, where it’s a field on the individual or prospect object.
In MCN, consent is its own standalone object, and it doesn’t have a native connection to the individual object. You have to create that connection yourself.
Without it, Salesforce will still reference the consent object in the back end when you send an email and automatically filter out contacts that haven’t consented. That’s pretty nice, but the downside is that you can’t see any of this in a segment. You could have a segment of 10,000 people and have no way of knowing how many have actually consented, because all of that filtering happens in the back end.
You would see the actual numbers in your reports after the send, but you can’t plan for it ahead of time. You don’t have the visibility to say, “This is my marketable database. These are the people actually receiving my emails”. That’s why the best practice setup matters. This guide isn’t about the basics. It’s about building best practices into your Marketing Cloud Next instance!
Step 3: Connect the Consent Object in Data Cloud
To get proper visibility into consent, you have to go into Data Cloud and set up the relationship between the consent object and your individuals.Navigate to Data Cloud > Data Model and find the Communication Subscription Consent object. Go to its Relationships tab, which is where you set the relationships between your objects.
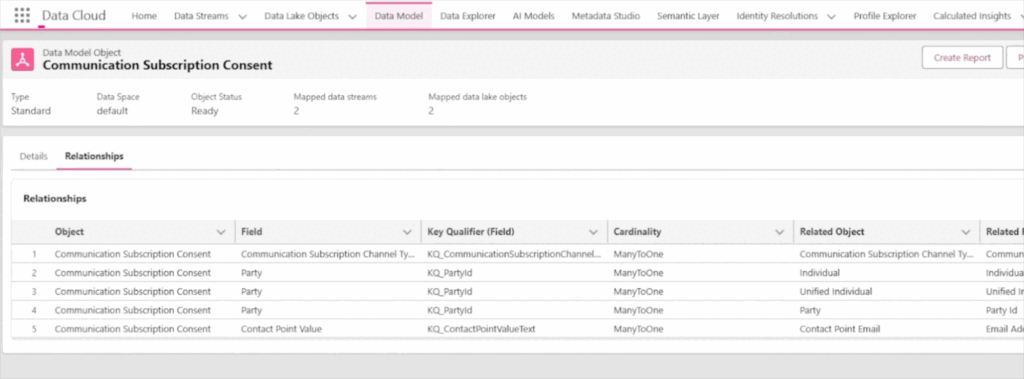
The key relationship you need is one that connects your consent to the contact point email, which is, in turn, connected to the individual.
To create this relationship, click Add Relationship. Select Contact Point Value, choose N-to-1 (N21) as the relationship type, select Contact Point Email, and connect it via the email address.
This is very important. Without this relationship, you cannot see consent status in your segmentation.
Step 4: Build a Segment for Your Marketable Database
Using the relationship you just created, you can now build a segment that shows how many of your contact point emails (connected to your unified individuals) are actually mailable.Here’s how to build it:
You want people who have an email, but more specifically, you want people whose email address is contactable.
- Start by building the segment on the Unified Individual.
- From there, navigate to the Communication Subscription Consent object.
- Set the filter so that the Consent Status must be equal to opt-in, because that’s how Salesforce stores it.
- Save the segment, and you’re done.
Now you can see your true marketable database size! You know what percentage of your database is marketable, and you have the visibility to plan your email sends with confidence.
What About Multiple Workspaces?
If you’re a parent company with child companies or multiple business units, you may be wondering how consent works across different workspaces.
Put simply, each workspace goes through the same subscription setup process, but they can have different subscription types and different consent lists that are uploaded.
The consent objects are tied to the different types of lists and subscriptions that you configure for each workspace.
Wrapping Up
Managing consent in Marketing Cloud Next requires a few extra steps compared to what you might be used to in other marketing automation platforms.
But once you create the subscription types, import your consent data, and establish the relationship between the consent object and the contact point email in Data Cloud, you’ll have full visibility into your marketable database and can start leveraging your email channel with confidence.
If you have any more questions about your MCN migration, don’t hesitate to reach out here. In the next episode, we’re going to take a look at Web Tracking! See you there.