
Episode 10: Audiences & Campaigns
TL;DR
- Build your audience as a segment, choosing a standard segment when you want the data to persist.
- Segment on the unified individual, then add the people who consented before any targeting filters.
- Use the recount to see exactly how many people qualify.
- Create your campaign like you would in Salesforce CRM, then set up a single email send.
- Select your segment, force a republish before sending, and set your communication subscription so only opted-in people receive the email.
If you’ve made it this far, you’re past the hard part!
You prepared your database, set up your data cloud, configured your DKIM key, and pushed through your migration. All of that less-than-thrilling groundwork is finally behind you, and now you get to do the cool stuff: run a real campaign and send emails out into the world.
Below, we’ll walk you through building your first audience segment and your first campaign in MCN. And to keep it concrete, we’ll use a real example. It’s a campaign for an AI event we hosted at a conference targeting everyone in our database with “AI” in their job title.
Let’s get into it.
Step 1: Create Your Segmentation
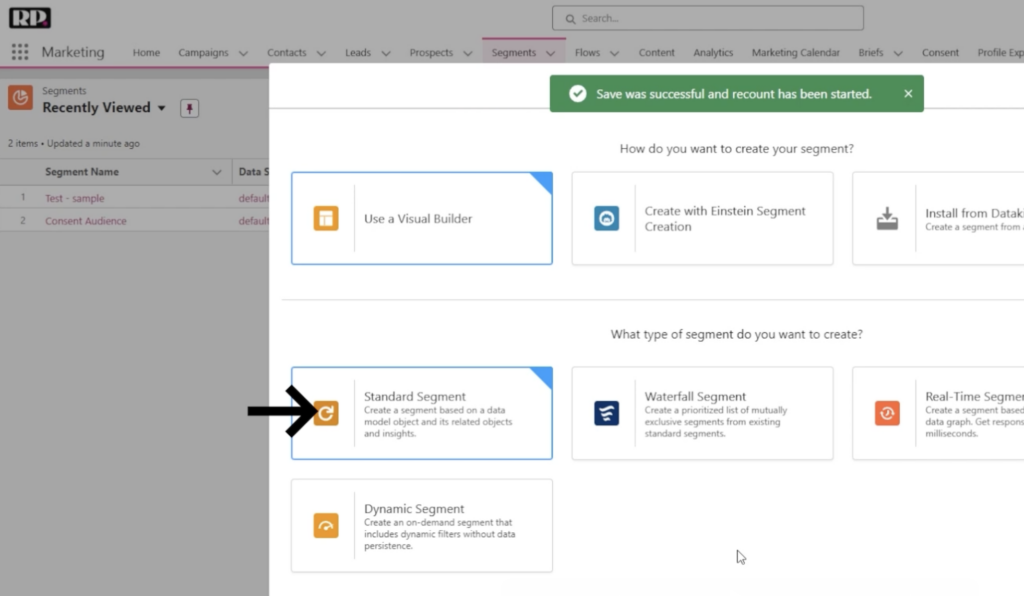
To start, click New on the segments page. For most use cases, we’d recommend the visual builder rather than Einstein or data kits.
The type of segment matters too:
- Standard segment: based on the data model.
- Waterfall segment: a prioritized list of other segments.
- Real-time segment: based on the real-time graph.
- Dynamic segment: an on-demand segment that’s only calculated when needed and doesn’t persist.
Since we’ll run this campaign for about a month until the event, we’ll use a standard segment so the data persists and can be traced.
Next, fill in a few settings:
- Data space: use the default, the only one we set up for our instance.
- Segment on: the unified individual, the people who come from contacts, leads, and prospects and get merged into one thing.
- Segment name: the identifier of the segment.
Set Your Publishing Schedule
Because we’ll send multiple emails to this segment, we want it publishing every day, at the beginning of the day. Publishing is basically recalculating and redefining who is part of that segment.
We only need it on business days, and since the event is a month out, we’ll set it to stop publishing on May 7th at 7 a.m. We’ll leave the look back window on its default of 90 days, since we don’t need it here.
Quick tip: if you hit a hiccup while building this out, just refresh the page.
Add the People Who Consented First
The first thing you always add to a segment is the people who consented. Follow this path:
Unified individual → unified individual contact point → communication subscription → consent → consent status equal opt in.

Layer On Your Targeting Filter
Next, add a job title that contains AI, then start the recount to see how many people land in the segment. In our case, we get 32 people who have opted in and have a job title containing AI.
For this event we only used one filter, but depending on your campaign, there are plenty of others to play with. You can also adjust the logic with AND/OR to build the segment that makes sense to you.
Step 2: Create Your Campaign
Now head over to Campaigns and create a new one. This part looks a lot like Salesforce, so if you’ve worked in the CRM, filling out the details will feel intuitive.
Fill in the basics:
- Campaign name: “2026 AI event.”
- Active campaign: yes.
- Status: In Progress.
- Start date: May 6th.
Save and open your campaign. Up to this point there isn’t much difference from a Salesforce CRM campaign. The real difference shows up in the next window.
Set Up a Single Email Send
To email this audience, choose a single email, which is what you use to send a one-time email at a certain date and time. Selecting it opens a flow with some automation already created for you. You can also choose open flow to open a Salesforce flow and build on it.
From there, set up the send:
- Schedule: send it Thursday at 9 a.m.
- Segment: select our “2026 cool AI” segment.
- Republish: force the segment to republish just before running the flow, so anyone who just entered your database still receives the email.
- Email: the email MCN created automatically is empty, so select one from your content.
- From name and address: for example, marketing at Revenue Pulse.
Don’t Skip the Communication Subscription
You also have to add the communication subscription, which defines what the communication is about.

This matters even if you didn’t build full consent tracking into your segmentation. MCN automatically removes anyone who isn’t part of the communication subscription, but you wouldn’t be able to see how many people that is. Instead of 32, you might see 3,000 with no idea how many are truly opted in, which would impact your results. Building consent into the segment gives you an accurate count of who you’re reaching.
Activate and Schedule
Finally, select your email, click Activate, and your emails will be scheduled to send.
Wrapping Up
We’re finally seeing all of that earlier setup pay off! We hope you enjoyed building your first audience segment and campaign. And if you have any lingering questions about the process, don’t hesitate to reach out to us here.
In episode 11, we’ll stay in this same campaign and shift to capturing leads through forms, so we can start collecting event registrations. See you there!