The Skeletons in Your Marketo Closet: A Marketo Cleanup Checklist

Every Marketo instance has a closet. 

It’s where old programs go to rest, fields from a retired integration gather dust, and a smart campaign from 2016 is still quietly running. 

Nobody opens it on purpose, because there’s always a launch or a report that feels more urgent. 

This Halloween, we’re grabbing a flashlight! Let’s clean things out.


What’s lurking in there

Zombie smart campaigns. 

Think of a trigger listening for fills on a form nobody uses, or a scoring campaign from a model you replaced years ago, still adding points. Each one seems harmless, but together, they clog your campaign queue and turn troubleshooting into a guessing game. If you want to do a quick test, open the Results tab on an active trigger campaign. If it hasn’t processed anyone in a year, it’s fair to ask why it’s still on.

Forms that refuse to rest. 

You moved to global forms, which is great! Meanwhile, the old local forms are still embedded on forgotten landing pages, quietly routing leads into the wrong programs (not so great).

Fields with no known purpose.

We’ve all seen things like “Lead Source 2,” “Lead Source Final,” or “Lead Source DO NOT USE.” Your sales team picks from four fields that look identical, and your reports never agree. Hiding the extras in Field Management is a good first step so nobody can pick the wrong one. But fields synced from your CRM usually need to be cleaned up on the CRM side first.

Ghost landing pages. 

That webinar from three years ago may still be collecting registrations for an event that already happened. Others still show outdated pricing or old branding, and they can keep popping up in search results long after your team has forgotten them.

The field with a mysterious warning label.

Picture a true/false field called “Do Not Turn Off – Ask Gary,” set to true for every person in your database. But the thing is, nobody knows a Gary…and the campaign behind it doesn’t seem to do anything. So you switch it off, and a few days later the product team is panicking because something in their platform broke. That platform had been reading the field all along. The scariest skeletons are the ones quietly holding something else up.

Skeletons in the closet next door. 

Not every skeleton lives in Marketo itself. Some hide in the systems Marketo talks to and haunt your sync instead. For example, say your Marketo records keep failing to update in Microsoft Dynamics, with no obvious error. The culprit could be Dynamics duplicate detection rules, which don’t just stop duplicates from being created; they can also block updates to existing records. When an admin piles up a dozen of them, your sync falls apart. If you’re on Salesforce, validation rules can pull the same trick.

Skeletons in the integration closet. 

You archived a few old programs in a connected platform, thinking you were just doing some harmless cleanup. But the sync to Marketo had other plans. Suddenly, long-forgotten triggers came back to life, overwriting field values nobody intended to touch. Even worse, the integration started burning through Marketo’s daily API limit until there was nothing left. By the time anyone noticed, every other integration relying on the API had gone silent for the day. Sometimes, cleaning up one closet wakes up the skeletons hiding in another 👻.

How to clean out the closet safely

  • Start with what’s still active. Anything running can still cause trouble, so active trigger campaigns, recurring batches, and approved landing pages go to the top of the pile.
  • Check what depends on it. Marketo’s “Used By” details help, but also ask your CRM, web, and product owners whether anything reads from Marketo through the API.
  • Turn it off before you delete it. Deactivate, wait a couple of weeks, and archive if everything is still running smoothly. If something breaks, you can reverse it and create documentation.
  • Write down why it stays. When something truly needs to stick around, note what it does and who owns it somewhere your team will actually look, so the next person isn’t left guessing.
  • Make it a habit. A quick quarterly sweep beats a massive cleanup every five years.

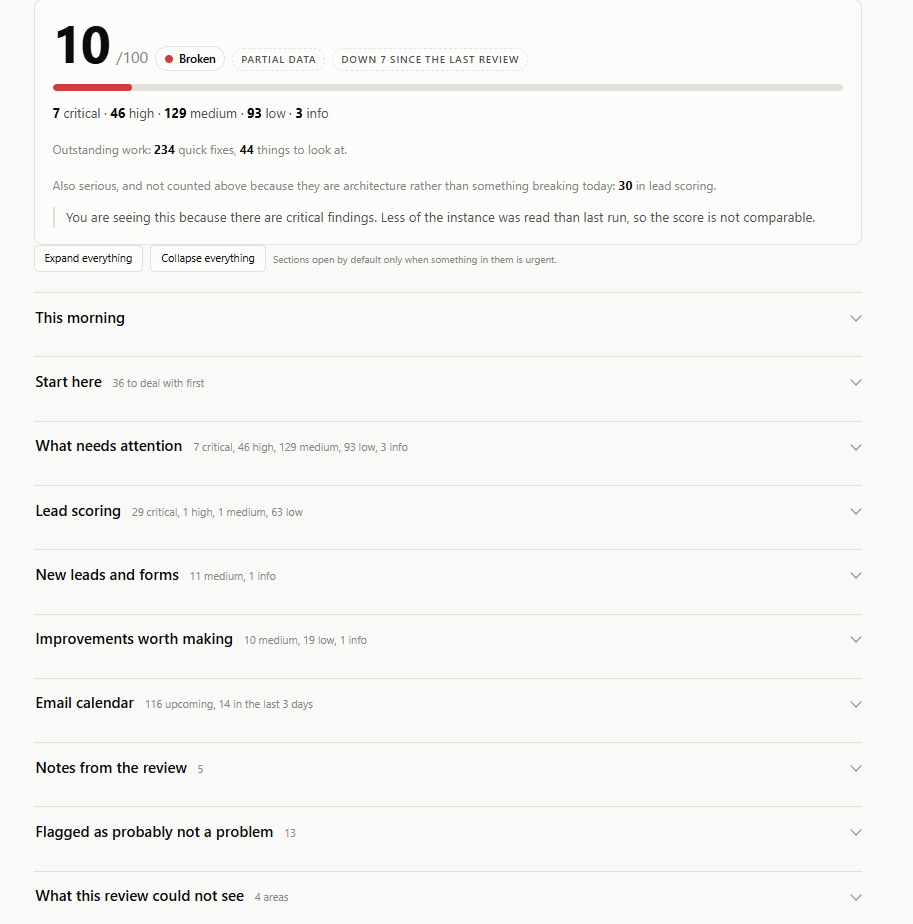
If your closet feels too full to face alone, our Marketo champions have opened plenty of them.

Reach out here to get a Marketo Health Check (the image below is an example of what this check could look like).


Happy Halloween from all of us at Revenue Pulse!

Essential Marketo Migration Tips

Migrations are a lot of work. Whether you’re moving from HubSpot or Pardot over to Marketo, or just shifting from one Marketo instance to another, there are a lot of moving pieces and it takes real effort to get right. So before you dive in, it helps to slow down and think through a few things.


Start with an honest inventory

The first thing we do on any migration is take a technical inventory across your systems. Look at what you’re running and why you’re running it. What are all these processes actually doing? Do you still need them? Is there something else that can handle the same job in the new system?

This step matters more than people expect. A lot of the time, clients want to bring something over simply because that’s what they’ve always done, or because they’re worried that leaving it behind might cause an issue. That’s understandable, but when you migrate on autopilot, you give up one of the best parts of the whole project.

Treat the migration as a cleanup

A migration is your one real opportunity to clear things out and get back to ground level without another major overhaul down the road. Since you’re already putting in the effort, you might as well use it to tidy up while you’re in there.

So question everything! Ask what each process is for and whether it still earns its place. This is where a partner with a lot of Marketo experience can save you a real headache, because we can point out the pieces you don’t actually need. Sometimes a process you’ve maintained for years is handled automatically in the new setup, or it can be done in a much simpler, lower-effort way.

Know the data you’re keeping

Redundant fields and processes are tempting. It feels safe to hang on to every bit of information, just in case. And yes, having it all there means you can get to any data you might want. But that extra baggage adds up pretty fast.

When someone on your team insists you need a certain field or report, ask yourself when it was actually used last. Is it something people look at daily, weekly, or once a quarter? Or is it one of those “we might need it someday” things that never really comes up? You’ll often find that a field marked as absolutely necessary hasn’t been touched in ages. Being realistic here keeps your new instance lean and much easier to manage.

Keep your expectations grounded

When you move to a brand new platform, you’ve just come off the sales process and the new tool feels like a shiny new toy. At this point, it’s easy to believe it’ll solve every problem you’ve ever had. And this isn’t only about the main platform; it happens with all kinds of tools, where you think, “finally, we’ll be able to do that thing we’ve always wanted to.”

A new system can do a lot. But it works best when you go in with clear eyes about what it will and won’t fix. Get the foundation clean, keep what actually matters, and you’ll set yourself up for a migration that holds up long after the excitement wears off.

We help teams migrate platforms every single day. If you need a helping hand, reach out to us here!

Email Deliverability and IP Warming Best Practices

That gap between “sent” and “seen” is what email deliverability is all about. You can write an incredible email with a great offer, but it won’t matter if the inbox provider decides not to show it. The good news is that deliverability isn’t luck. It comes down to a handful of things you can actually control, and most of them are fixable. Here’s how we think about it, roughly in the order that tends to move the needle most.


1. It starts with your list, not your email

Before you touch a single word of copy, look at who you’re emailing. List quality is the biggest lever you have, and it’s the one people ignore most.

Inbox providers, Google especially, watch how people react to your messages. When you send to folks who open, click, and reply, your reputation climbs. But when you send to dead addresses and people who stopped caring months ago, your reputation sinks. Keep in mind that annual list cleanup isn’t enough anymore. If you scrub your database once a year, some contacts sit unengaged for twelve months or more before you remove them, and every send to them chips away at your standing. Move to an ongoing process instead. Retire contacts as they go quiet, not on an annual schedule.

And be skeptical of leads from outside sources. A data provider telling you an address is valid is not the same as it actually being valid. Run new leads through a dedicated validation tool such as NeverBounce, Kickbox, or QuickMail before they ever get an email. It’s a small step that prevents a lot of bounces.

If you have contacts that are marketing-suspended or quarantined, keeping them in your database is totally okay, as long as you never send to them. They’re still useful for reporting; just make sure every send excludes them. And be careful with one-off internal experiments or surprise test blasts. They can feel harmless in the moment, but sudden unusual sending leaves a mark on your reputation that sticks around longer than you’d expect.

2. Prove you’re really you

Inbox providers get impersonated constantly, so they lean hard on authentication to decide whether to trust you. These three records do the heavy lifting when it comes to that authentication (with a fourth one worth knowing about too):

SPF (Sender Policy Framework) lists the servers allowed to send email for your domain. It ends in either “-all” (a hard fail) or “~all” (a soft fail). A hard fail tells receivers to reject anything not on the list, which sounds strict and safe but can backfire. If a legitimate sending path isn’t perfectly accounted for, your real mail gets rejected outright. For most marketing setups, a soft fail is the safer choice. It still flags anything suspicious without slamming the door on your own campaigns. If your root domain is on hard fail, switching it to soft fail is a quick, worthwhile change.

DKIM (DomainKeys Identified Mail) adds a cryptographic signature to your emails. It proves the message actually came from you and wasn’t tampered with in transit. 

DMARC ties SPF and DKIM together and tells receivers what to do when a message fails those checks. You can set the policy to “none” (do nothing), “quarantine” (send to spam), or “reject” (block entirely). Reject is the strictest, but for marketing sends running through platforms like Marketo, quarantine often performs better. Reject can wipe out legitimate mail the moment any small alignment issue appears, while quarantine gives you a softer landing. One gap people miss is to add a subdomain policy (sp=quarantine). Without it, someone could spoof a subdomain you don’t even use. While you’re in there, add reporting addresses so you can receive DMARC failure reports and catch problems early. It’s worth monitoring those closely for a while, especially right after making changes.

BIMI (Brand Indicators for Message Identification) is the fourth one. It puts your logo next to your emails in supported inboxes, which builds trust and recognition. It requires DMARC set to quarantine or reject and a properly formatted SVG version of your logo. We’d call this a later priority rather than an urgent fix. Sort out your other records and your list first. That said, BIMI is heading toward becoming an industry norm, so it’s smart to budget for it down the road.

3. Clean up what’s inside the email

Once your list and your records are solid, the content itself can still get you filtered. Spam systems read your email, and a few common things trip them up:

Avoid spammy keywords. These are promotional trigger words in the subject line or body, like free, credit, refund, offers, acceptance, and act now; they all raise your spam score. You don’t have to strip every sales word from existence, but go lighter than feels natural. If you have a lot to promote, send a short email that points people to a landing page where the full offers live. It’s also worth dropping emojis from subject lines, since they can trip filters too. A free spam-word checker is an easy way to catch the worst offenders before you send.

Keep your links in check. Too many links look spammy, so aim for fewer than twelve per email. And long URLs are a problem of their own. Some filters penalize links over 120 characters, and image URLs are a sneaky culprit here. When an image sits several folders deep, its address balloons. Move images closer to the root of your hosting and keep file names short, and those URLs shrink fast.

Fix broken characters. Odd symbols that show up from bad encoding or copy-pasting out of Word or Google Docs make an email look sloppy and suspicious to filters. Give your final copy a quick scan for them.

Go easy on the HTML. Drag-and-drop email builders (and MJML exports) generate far more code than a hand-built email needs. They pack in nested tables, wrapper elements, and repeated inline styles. All that bloat makes your email heavier and can push you past Gmail’s 102 KB limit, at which point Gmail clips your message and hides part of it. To fix this, export the HTML from your template, paste it into an AI tool like Claude, Perplexity, or ChatGPT, and ask it to clean up the structure. You’ll get a lighter, tidier version in seconds.

One more content-adjacent tip: rethink open tracking. A few EU markets, including Italy and France, are moving toward requiring explicit consent to track email opens. Click-through rate is a more reliable signal of interest anyway, so leaning on CTR over opens is a reasonable call.

4. Send like a person, not a firehose

How you send matters as much as what you send. Inbox providers are pattern-watchers, and erratic behavior makes them nervous.

With that said, it’s important to warm up anything new: A new domain, mailbox, or IP has no reputation yet, so don’t come out of the gate with a huge blast. Start with small volumes to your most engaged contacts, then increase slowly and steadily. High early engagement from people who genuinely want your emails builds your reputation quickly, which lets you safely reach less-engaged contacts later. The same caution applies after a long pause. Ramping back up too fast reads as suspicious.

Then, be sure to keep your daily volume steady. Say you’re aiming for around 500,000 emails a week. Sending 300,000 on Monday and 50,000 on Tuesday sends a jumpy, unpredictable signal. Spreading it evenly, roughly 100,000 a day, looks far more stable, and that steadiness correlates directly with a healthier sender score. This one is genuinely hard to pull off in practice, since it fights against campaign calendars and team workflows, but it’s worth aiming for even if you only get partway there.

5. Watch the signals that matter

Segment your audience by engagement and send accordingly. Group your contacts by how recently and how often they’ve interacted, and stop emailing the cold ones. 

Mailing inactive people drags down your open rates and raises your spam risk, and that hurts everyone else on your list too. Set realistic expectations while you’re at it: one recent benchmark put average read rates around 23%, so plenty of unopened mail is normal even on a healthy list. Aim for a stable, predictable cadence rather than going quiet for weeks and then flooding inboxes.

And know your bounces. A hard bounce is permanent, usually a bad or mistyped address (someone entering “hotmal” instead of “hotmail,” say), and those should come off your list right away. A soft bounce is temporary, like a full mailbox, and it’s fine until it keeps happening. The ones to really watch are spam complaints, the reports generated when someone hits “report spam.” A rising complaint rate is a loud signal that something needs attention.

Next, make sure you’re keeping tabs on click-through rate, bounce rate, and spam complaints, and pause underperforming campaigns quickly instead of letting them run. Watch your sender score and check that your domain and sending IP aren’t showing up on blacklists. If you set up DMARC reporting earlier, those reports are your early-warning system.

Once your email is ready, always test before you send (obvious at this point, but still important!). Run your email through inbox placement testing to see where it actually lands across providers before it goes to your full list. Gmail tends to be the strictest, so if you’re reaching the inbox there, you’re usually in good shape elsewhere.

And while you’re cleaning things up, positive engagement signals help. Warming activity that generates real opens and clicks can offset the drag from unengaged contacts during the transition, giving your reputation some breathing room while your list gets healthier.

Where to start

If you’re staring at all of this wondering what to touch first, here’s a preliminary checklist you can follow (Ideally, have a tool like Email on Acid or Litmus to help you through this process):

  • Align email subject lines with body copy
  • Add a preheader
  • Verify sender options (Make sure you’re sending from a valid email address and domain that’s set up against SPF and DMARC)
  • Confirm that all links are functional and correctly redirected 
  • Keep HTML under 100kb
  • Keep image weight under 150kb
  • Make sure everything is mobile responsive
  • Make sure all records are marketable 
  • Remove all bounces from your list.

None of this is quick, and you won’t fix it all in a week. But deliverability rewards steady, consistent effort. If you’d like a hand auditing your setup or working through any of these steps, that’s exactly the kind of thing we do. Reach out to us here!

Claude Skills: The Key to Unlocking Your Marketo MCP Connection

In our last post, we walked through instance context: the reference document that teaches your AI what your Marketo instance looks like (such as your folders, naming conventions, channels, tokens, and fields).

That solves the knowledge problem, turning a generic AI into one that knows its way around your specific setup.

But knowing your way around a place isn’t the same as knowing how to do the work inside it.

That’s the gap we’re closing today.

Instance context handles knowledge, while Claude Skills handle process. Together, they turn your AI from a clever tool that can reach into Marketo into a teammate that can actually run Marketo processes.

From Context to Process

Think about almost any real task in Marketo. It’s rarely a single click; it’s a sequence. You clone a program, rename it to your convention, move it to the right folder, set the tokens, check the smart campaigns, and leave it for approval. The order matters, and each step depends on the one before it.

Doing that work through the API in a chat window is far less forgiving than doing it in the Marketo UI itself. The UI hides complexity behind clicks. You drag a program into a folder, right-click to clone, and see every token on one screen. The API, however, offers none of that. It’s dozens of granular endpoints, and you have to know which ones to call, in what order, and with which IDs.

The Marketo MCP runs on that API, so an AI working through it inherits all of that non-intuitiveness. Left alone, it will probably find a path to get the job done. But it might not be your path. It might be slower, more expensive, or subtly wrong.

This is where skills come in. A skill is a written playbook your AI reads before executing a specific type of task. It spells out the workflow: the steps, the order, the API calls, the decision points, the edge cases, and the moments where the AI should stop and ask you instead of guessing.

Thing of it like this. If “instance context” is the onboarding doc you hand a new hire, skills are the SOPs. One teaches them how the company works, while the other teaches them how to do their job.

Skills and Instance Context Work Together

It’s important to keep in mind that skills should never hardcode the facts about your instance.

A skill shouldn’t have your “Webinars” folder ID baked into it or carry its own copy of your naming pattern. Instead, every time it runs, it reads the instance context first and pulls what it needs. This way, there is a single source of truth.

When someone updates a template with a new token or destination folder, they change it once in the context, and every skill picks it up automatically. You’re never hunting through five skills to fix the same folder ID.

Instance context holds the “information” (what exists and what the rules are). And Skills hold the “procedures” (what to do and in what order). Information will change often, but procedures change rarely. That’s why keeping them separate makes it much easier to maintain both.

One last thing to add is that when a skill reads folder trees and template IDs straight from the context doc, it doesn’t rediscover them on every run. That saves API calls. And since Marketo limits how many calls you can make in a given window, every wasted discovery call has real cost.

Three Skills in Action

Now we’re going to run through three specific skills to illustrate all of this in action. These aren’t meant to be in-depth tutorials, so we’re going to keep it high-level.

Our goal is to show you the shape of a skill and the spots where the API turns out trickier than the UI ever lets on.

1. Clone Program

Here, you type something like “set up a webinar for next Thursday,” and the skill hands you back a fully placed, named, and tokenized program in one pass. Roughly, here’s the path it follows:

  1. Read your request for the details: program type, name, date, region, any token values.
  2. Pick the right template based on program type, and confirm the name against your naming convention. If the template choice is ambiguous, ask rather than guess, since that choice drives the channel statuses and smart campaigns downstream.
  3. Find the destination folder and clone.
  4. Set every token you provided, and ask for any required ones still missing in a single consolidated question.
  5. Surface the smart campaigns, ask which to activate, and log a follow-up task for the remaining manual steps.

A few of these steps are sneakier than they sound.

For example, take finding the right template. In the UI, you just browse to your Templates folder and right-click clone. Through the API, the AI has to know which folder holds your templates, query the programs inside by folder ID, and then tell the live template apart from the deprecated lookalikes sitting right next to it. Instance context shortcuts all of that, since the template list and IDs are already written down. Several discovery calls drop to zero.

Folders are the same story. A quick mouse drag in the UI becomes a folder-tree query through the API. And the right home for a new program usually isn’t the top-level type folder; it’s a year or category subfolder underneath it, so the skill carries a rule like “always drill at least one level down before cloning” while the context supplies the actual IDs.

Then there are rate limits, which nobody ever thinks about while clicking around in the UI. A token-rich template can fire off 15 or more token update calls in a row, and the skill has to expect Marketo’s rate limit errors and pace itself accordingly.

2. Clone Email (Prepare Email)

This is the fast track from an email brief to a ready-to-review email program. Roughly, here’s the path it follows:

  1. Read the instance context for the naming convention, destination folders, and the email template’s token schema.
  2. Parse your brief into token values.
  3. Generate and confirm the program name.
  4. Clone into the right folder and set the tokens.
  5. Summarize what’s done and what’s left, since the smart list, approval, and send are still yours.

Two things make this skill more than a glorified copy-paste.

The first is token formatting, the kind of quirk a human just absorbs over time but an AI needs spelled out. Classic example: your template might expect CTA URLs without the “https://” prefix because it tacks the prefix on itself. In the UI you’d spot the doubled “https://https://” the second you previewed it. Through the API, you’d never see it coming, unless the skill writes that rule down.

The second is edge cases, which is really where the work lives. When the destination year folder doesn’t exist yet, the skill finds it or creates it. When you reference a program by partial name, it runs a lookup, and if it’s still unsure, it asks. When the template only supports one CTA, it uses the primary one and flags the limitation. The happy path is easy. It’s the documented exceptions that make a skill reliable.

3. QA Program

After a program is created or changed by your AI or a person, this skill runs a structured QA pass. The clever part is that the checklist lives in your instance context, in the QA Instructions section, split into two categories:

  • The first is what the API can verify, which the AI runs automatically: the program exists, sits in the right folder, matches your naming convention, uses the correct channel, carries the required tags, has tokens filled rather than left at defaults, has approved email assets, and has a smart list with rules and the expected smart campaigns.
  • The second is what needs a human, which the AI flags but never pretends to handle: rendering across email clients, mobile responsiveness, personalization fallbacks, whether the smart list logic targets the right audience, send volume, timing and timezone fit, fatigue rules, legal compliance, and A/B setup.

That second list points to the most important idea in the whole skill. The API can tell you that a smart list has rules, but it cannot tell you the rules are right. The existence of rules is checkable, but rules being correct takes judgment. Part of the skill’s job is knowing where that boundary sits and saying so out loud, instead of handing you false confidence. This is what trustworthy AI operations look like: not “the AI checks everything,” but “the AI checks everything checkable and hands you the rest with a named list.”

Which Skills Should You Build?

A simple way to decide what skills to build is to look at the work you do many times a day or week that follows a repeatable process.

If you can write an SOP for a new team member, you can write a skill. Good candidates jump out quickly, like cloning programs, preparing email sends, QA passes, standard reporting pulls, and recurring list hygiene – as long as the MCP has the right endpoints available to accomplish the task, a skill can be made. The poor ones are one-off, judgment-heavy, or constantly changing work, so don’t force it!

In other words, the best way to spot a skill is to notice repetition. The third time you type the same multi-step instructions into a chat, that’s a skill telling you it wants to exist. And like your instance context, skills should be organized and maintained. Keep them in a shared, central place, version them, keep them current, and have them reference the instance context rather than duplicating it.

Start with the task that drains the most time, write that skill, and let the wins compound from there.

If you want something to get you started, we’ve made all 3 of the skills in this article available for free! 

It seems we can’t find what you’re looking for.

And we’ve even created a full MOPs skills community where folks can create, download, and share all kinds of MOPs skills in one place. Take a look here.

×

Join our network to download free Claude Skills!

Ready for practical guides, expert advice, and honest takes on AI and MOPs?

Join our email list below. We will never spam you.

Why Your Marketo MCP Needs Instance Context (Free Claude Skill Download)

Table of Contents

In our last article, we walked through how to set up the Marketo MCP server connection. Getting that connection live is a real milestone. Once it’s working, your AI can reach into Marketo and start doing actual work like reading folders, cloning programs, pulling lead records, and updating tokens.

But there’s a catch that trips up a lot of teams.

Being able to reach your instance is not the same as understanding it.

An MCP connection hands your AI the keys to the Marketo API. It gains access. But what it doesn’t gain is any sense of how your instance is built, or why it’s built that way. And as every Marketo admin knows, no two instances are alike.

Think about everything that makes yours different from the next:

Folder structure 

Some teams organize Marketing Activities by year, others by region, others by workspace. You’ve got templates folders, archive folders, and that one folder structure only the person who built it fully understands. An AI has no way of knowing where things are supposed to live.

Naming conventions 

Program names, asset names, smart campaign names. These patterns are usually carried around in people’s heads, rarely written down, and often inconsistent even within the same team.

Channels and statuses 

Channels are custom to each instance. One company’s “Webinar” channel runs Invited > Registered > Attended > Attended On-demand. The next company defines completely different statuses and a different bar for what counts as success.

Templates 

Which programs are the official ones to clone from? And which are abandoned drafts that just look like templates? The API can’t tell the difference.

Lead fields

Instances pile up hundreds of fields over the years. Only a fraction are actually in use. Some are deprecated, some sit empty, and a handful of custom fields are the ones that really matter.

Integrations 

Salesforce, your webinar platform, enrichment tools. Each connection comes with its own rules about what should and shouldn’t be touched.

Tokens

Which my.tokens are standard on your programs, what they map to, and what their default values are.

None of that is visible from the API alone. The instance context is what bridges the gap between a generic AI and an AI that operates like a member of your team.

How Instance Context Makes a Difference

The fastest way to see why this matters is to watch what happens when the context isn’t there. Below, we’ll look at two simple request examples and what will happen if the AI has instance context vs. no instance context.

Example A: “Create a webinar program.”

Without instance context, the AI might:

  • Clone from the wrong program, grabbing some random old webinar instead of your official template
  • Build a program from scratch using the wrong channel, like a generic “Email Send” channel for what should be a webinar
  • Drop it in the wrong folder, or worse, the root of Marketing Activities
  • Ignore your naming convention completely
  • Leave every template token sitting at its placeholder default

With instance context, the same prompt produces something usable:

The AI clones the correct template, places it in the right year and type folder, follows your naming pattern, sets the proper channel, and fills in the tokens you expect.

Same request, completely different result.

Example B: “Pull information about this lead.”

Without context, the AI might:

  • Read from the wrong fields, like a deprecated scoring field instead of the live one
  • Return empty or stale values and present them as the answer
  • Skip the fields that actually matter for the question, like lifecycle stage or ICP fit

With context, it knows which fields are the source of truth, which ones are dead weight, and which ones to report on for the question you actually asked.

These failures happen when the AI is uninformed. Any new hire would make these exact mistakes on day one without someone to show them the ropes. Think of “instance context” as that onboarding doc. You wouldn’t drop a new teammate into your instance with zero guidance and expect clean work, and the same logic applies here.

What a Good Instance Context Looks Like

A solid instance context is a single, structured reference document that your AI reads before it does any work. Think of it as the employee handbook for your instance. Let’s walk through what belongs in it and why each piece earns its place.

1) Instance details

The instance URL, workspaces, lead partitions, and primary timezone all anchor everything else. The timezone alone saves you from a pile of scheduling mistakes.

2) Folder structure

A tree of the relevant folders with their IDs, plus two maps: which template programs exist (name, type, ID, channel) and which destination folder each program type belongs in. The IDs are what make the AI’s work deterministic instead of guesswork.

3) Naming conventions

The naming pattern for each program type, pulled from real programs in your instance. This keeps AI-created assets indistinguishable from the ones your team builds by hand, which protects your reporting and keeps everything searchable.

4) Channels and program statuses

Each channel, which program types use it, the full status progression, and which statuses count as success. If you get the channel wrong, you’ll break reporting and lifecycle tracking for that program from then on.

5) Token standards

The tokens on each template, their types, and their default values. The AI needs to know which tokens have to be filled and what a “still set to default” placeholder looks like so it doesn’t ship one.

6) Email program configuration

The clone-and-configure workflow spelled out step by step, plus default sender info like from name, from email, and reply-to. This captures how your team actually works, not just what your assets contain.

7) Lead and list configuration

These are the custom fields that matter, grouped by purpose (lifecycle and scoring, stage dates, firmographic and segmentation), along with your suppression and compliance lists. This is the direct fix for the “wrong-fields” problem from Example B above, and the suppression lists act as a compliance safety net that the AI should never skip.

8) CRM integration

Your sync rules, and a clear statement of what the AI should and shouldn’t touch. Changes in Marketo ripple straight into Salesforce, so the AI needs to understand this domino effect before it does anything.

9) Scheduling and operations rules

Send windows, blackout dates, and frequency caps. These are basically “human judgment” things written down as rules, so your AI never tries to schedule a 3am send on a Saturday.

10) Audit and QA standards

Define what your severity levels mean and what gets flagged. This sets the quality bar in writing instead of leaving it to chance.

11) Tags and reporting

Your tag types, which ones are required, and which program types they apply to. A missing required tag won’t throw an error, it’ll just quietly break your reporting downstream.

12) Integration notes

Webinar platforms, enrichment tools, and anything else connected to the instance. Programs often lean on external systems that the API simply can’t reveal on its own.

13) QA instructions

This one might be the most valuable section of all. It splits every check into two lists.

The first covers what the API can verify automatically. Such as:

  • The program exists
  • It’s in the right folder
  • It uses the right channel
  • The name matches your convention
  • The tokens are filled
  • The email is approved
  • The smart list has rules

The second covers what still needs a human:

  • Rendering across email clients
  • Personalization fallbacks
  • Whether the smart list logic targets the right audience,
  • Send volume
  • Timezone fit
  • Legal compliance
  • A/B setup

Laying it out this way makes the division of labor explicit. The AI can self-check everything on the automated list, and your team knows exactly which checks are still theirs to own.

Practical Considerations

Now, let’s touch on a few practical things worth knowing about this “instance context” document.

It’s meant to be constantly evolving, not static. You can generate and refresh it by pulling live data straight from the Marketo API. We’ve actually built a skill that does exactly this: it reads your folders, channels, programs, tokens, fields, and tags through the MCP and merges them into the document for you.

Smart merging is what makes that work. The API-sourced sections get refreshed automatically because they’re the parts that go stale. The human-written sections, like your scheduling rules, compliance notes, and integration decisions, stay put because they capture decisions rather than data (you don’t want an automated refresh wiping out the judgment calls your team made).

And don’t be put off by placeholders like [NOT CONFIGURED] or NEEDS TEAM INPUT. Those are features, not flaws. They make the gaps visible and prompt the right conversation, instead of letting a blind spot sit quietly until it causes a problem.

It’s Not a Document, It’s a Practice

Building the instance context is the first step, but the real payoff comes from how your team uses and maintains it. A great context that lives in one person’s chat history isn’t doing much for the rest of your organization.

Here’s how to get value out of it over time.

Share it with the whole team. It should live in a central repository everyone can reach, not buried in a local folder or one teammate’s previous AI conversations. Everyone working against the instance should be using the same context; in their chats, in their projects, etc.

Keep it current. Always stamp it with a “last updated” date, and ideally a “last refreshed from API” date too. Set a routine: refresh on a schedule and again after any meaningful change to the instance, such as a new channel, a new template, a field change, or a new integration.

Enforce consistent usage. The context only helps if it’s actually attached to the work. Make “AI work uses the instance context” a team norm, the same way “programs follow the naming convention” is already a norm for you.

Audit against it. Every so often, check the Marketo audit trail for activity happening outside the rules the context defines: programs created in the wrong folders, off-convention names, channels showing up where they shouldn’t. This catches drift from both your AI and your humans, and it tells you whether the context needs an update or the behavior does.

So there you have it!

Instance context is what turns AI from a clever tool into a governed teammate.

The teams that get the most from the Marketo MCP server connection will be the ones with the best instance context implementation.

As mentioned before, the “Instance Context” Claude skill we designed will be a huge help. It reads your folders, channels, programs, tokens, fields, and tags through the MCP server and merges them into the instance context document for you.

You can download that for free here:

Instance Context

This skill enables the rest of the skills on this page. Learn more.

And if you’re unsure whether your instance is ready to take advantage of the Marketo MCP server connection, reach out to us here. This is exactly the kind of thing we help clients with every day!

×

Join our network to download free Claude Skills!

Ready for practical guides, expert advice, and honest takes on AI and MOPs?

Join our email list below. We will never spam you.

How to Set Up the Marketo MCP Server Connection (Step-by-Step Guide)

The Marketo MCP server is finally here, and it’s a big deal for marketing ops teams.

A quick refresher in case it’s new to you: MCP (Model Context Protocol) is the standard that lets AI models like Claude talk directly to your tools. With the Marketo MCP, you can connect Claude to your Marketo instance and ask it to do real work (ie. finding a lead) right from a chat window.

For now, it’s in beta, so not everyone has access yet (to get in, you fill out a form on the Experience League page).

But we’re seeing a lot of people who do have access get stuck trying to set it up properly.

The documentation is dense, there are several moving parts, and one small slip (like a backwards slash in a file path) can break the whole thing.

That’s why we put this guide together. Our SVP of AI and Automation, Lucas, recorded a full walkthrough of the setup on Claude Desktop, and we’ve turned it into a clear tutorial you can follow along with.

Let’s get into it.


What You’ll Need

  • Claude Desktop (the desktop app, not the browser version)
  • Node and npm (npm installs automatically with Node)
  • The Marketo MCP bridge.zip file, downloaded and unpacked
  • Admin access in Marketo, to create a role, an API-only user, and a LaunchPoint service
  • Beta access, requested through the Experience League form

Step 1: Install Node and npm

The Marketo MCP runs on Node, so install that first. Go to nodejs.org, download the installer, and run it. npm comes bundled in.

To confirm both are working, open your command prompt and run:

If you see a version number for each, you’re good to go!

Step 2: Download and Unpack the Bridge File

Download the Marketo MCP bridge.zip file and extract its contents. Put the unpacked folder somewhere you can easily reference, because you’ll need its file path soon.

Inside the extracted folder, open the README. It walks through the build and includes the exact mcpServers block you’ll paste into Claude’s config next.

Step 3: Set Up Your Claude Desktop Config

Open the Claude Desktop app and go to Settings > Developer > Edit Config. This opens your config.json file. The first time you open it, mcpServers will be an empty JSON object.

Copy the mcpServers block from the README and paste it in. Give your server a name you’ll recognize. We used Marketo MCP test. Your block will look something like this:

For the path in args, replace /path/to/marketo-bridge/bridge.mjs with the actual location of the bridge.mjs file in your unpacked folder. On Windows, select the file and press Control + Shift + C to copy its path, then paste it in. One thing to watch: Windows paths come in with backslashes (\), so flip them to forward slashes (/) or the path won’t work. Leave the credential fields for now. You’ll fill those in after grabbing them from Marketo.

Step 4: Create a Role in Marketo

The MCP connects the same way an API service does, so set it up like any other API integration.

Go to Users and Roles > Roles and create a new role. We named ours MCP access test. Give it API access, but stay conservative.

Note: The MCP can only use the endpoints Adobe has configured as tools. So even if you grant user management API or delete leads in the role, the MCP can’t act on them because Adobe hasn’t exposed them as tools. We left delete leads off entirely, as a precaution in case that endpoint opens up later.

Step 5: Create an API-Only User

Create a new API only user. You don’t need a real email or name, so [email protected] works fine. Assign the role you just built, then create the user.

Step 6: Create a LaunchPoint Service

This step is best practice and required. Create a LaunchPoint service connected to your API-only user. Choose Custom as the service type, give it a name and a short description, and select your API-only user. Create it, then open View Details. This is where your client ID and client secret live.

Step 7: Add Your Credentials to the Config

Back in config.json (it’ll open in a code editor like VS Code or in Notepad, either is fine), drop in your three values:

  • Client ID (from the LaunchPoint service)
  • Client secret (from the LaunchPoint service)
  • Munchkin ID (found in your Marketo URL)

Save the file.

Step 8: Restart Claude Desktop

Claude needs a full restart to pick up the changes. Close the app completely, give it a few seconds to fully shut down, then reopen it.

Step 9: Confirm It’s Working

A couple of quick ways to check. In Claude, go to Settings > Developer. Here, you should see your server listed by the exact name from your config (Marketo MCP test). You can also open connectors to see it listed under the same name.

Then put it to work. Ask Claude to do something simple, like find a specific lead. It’ll think for a moment, check its available tools, call the right one, and return the lead. When that happens, your Marketo MCP is live!


That’s the full setup. Once it’s running, you can start experimenting with what the Marketo MCP can do inside your own instance (it’s pretty awesome).

If you get stuck partway through, or you’re weighing bigger questions about AI agents and where they fit into your MOPs workflow, we’re always happy to talk it through.

This is the kind of thing our team works on every day, and we’d love to help you get it right!

Reach out to us here for a chat.

Key Takeaways from Adobe Summit 2026

Our team had a blast at Adobe Summit 2026 last week!

Now that we’ve had a few days to decompress, we wanted to share some of our biggest takeaways from the event.

There were so many great sessions and interesting conversations this year. From major Marketo announcements to the continued rise of AI agents, this Summit felt like a turning point. Not just for the platform, but for the community around it.

Here’s what stood out to us.


It Felt Like Marketo Was Back

If you’ve been in the Marketo world for a while, you know there have been lingering questions. Will the platform get the level of investment the community wants to see? When will things on the roadmap start to roll out? These are conversations we’ve been hearing for a while now. 

But this Summit put a lot of that to rest.

The community energy was noticeably different. People were genuinely excited, having forward-looking conversations about what they could build, how they’d use the new tools, and what all of it means for their work. Marketo Champions were out in full force, and it wasn’t hard to see why. They had something real to advocate for this year.

On the product side, Marketo had features actually launching the same week as Summit. Not just roadmap previews, but tangible updates rolling out in real time. It was exciting to see that kind of momentum.

And the broader integration story got clearer too. The roadmap showed how Marketo connects with CDP and AJO in ways that make sense, and it paints a much more cohesive picture of where Adobe is taking things. The “is Marketo being sunset?” conversation feels like it’s completely over.

AI Moved From Theory to Practice

AI has been a recurring theme at Summit for a few years now. But at previous conferences, a lot of the conversation was theoretical. “Here’s what these tools might be able to do.” “Imagine a world where…”, and so on.

This year, however, there were far more real-life examples of companies using AI in scalable, meaningful ways. The sessions that got the most buzz were the ones that showed something working, gave attendees detailed instructions, and left people feeling like they could go home and actually do something with what they learned.

On the Marketo side specifically, the AI announcements felt grounded in the day-to-day reality of Marketing Ops. Callable agents for things like data management, segmentation, and standardization. Build with AI as a conversational interface where you interact with an agent to perform specific tasks. And a future direction where teams could eventually have multiple AI agents working together inside the platform at once, which was announced as “MarketoClaw”. 

The theme across all of it was essentially: What’s been manual is becoming conversational. Less time clicking through menus, more time thinking about strategy. As one of our team members put it: “Finally, we’re going to have automation to set up the automations.”

The most exciting part to us isn’t about AI replacing what we do; it’s about AI taking away the parts we’ve been ready to move on from. The repetitive setup, the tedious data work, basically all the tasks that eat up hours but don’t require much creative thinking. That’s what’s being handed off, and it frees up space for the strategic work that actually moves the needle.

For anyone who hasn’t been deeply involved in AI initiatives yet, this Summit was definitely a serious wake-up call. AI was in almost every session title and woven into virtually every conversation at the event. It’s no longer a side topic or a “nice to have.” It’s the direction everything is moving.

MCP Changes the Game

One of the more significant announcements was Adobe’s release of its own MCP server for Marketo.

For context, several companies (including us at RP) had already built their own MCP connections to Marketo so we could plug in external AI tools. Adobe offering a native MCP server is a big step forward for the broader ecosystem.

What makes this interesting is what it signals. It’s essentially an acknowledgment that AI isn’t going to be a single-platform play. Adobe built native AI tools inside Marketo, and there was plenty of that on display at Summit. But the MCP server shows a recognition that the community will want to use other AI tools alongside one another.

That dual approach feels very true to what Marketo has always been about. Flexibility and customization. You can use what Adobe builds natively, or you can connect whatever external AI tools fit your workflow. The choice is yours, and you’re not locked into one path.

This is a shift worth paying attention to. The future of AI in MarTech isn’t going to live inside any single platform. It’s going to be about interoperability, and MCP is a big part of making that possible.

Instance Readiness Will Determine Who Benefits First

The “garbage in, garbage out” conversation is nothing new in Marketing Ops. Clean data, solid naming conventions, and good documentation have always mattered. But with AI now in the mix, there’s no hiding from it anymore.

Every Marketo instance is different. The quality of your field definitions, governance, and overall instance structure will directly impact how well AI agents can understand and operate within your environment. The most organized instances are going to see the benefits first, simply because agents can make sense of what they’re working with. Bad data leads to bad AI outputs, and AI only accelerates the decisions you’re making. So if those decisions are based on messy data, you’re just making bad calls faster.

The concerns we heard at Summit reflected this. People weren’t questioning whether the AI technology works. They were asking whether their organizations are set up to use it effectively. Internal adoption, access, governance, and readiness are the right areas of focus. Our team had some great conversations with clients at the event about what they can be doing right now to prepare for the capabilities Marketo is rolling out.

Looking Ahead

Summit 2026 brought real momentum back to the Marketo community.

The roadmap felt meaningful, the AI direction felt practical, and the conversations felt more forward-looking than they have in a long time. We’re excited about where Marketo is headed and how these changes will reshape the way we all work. 

We’re already helping clients get their systems and teams ready for what’s coming. So if you want to talk through what this means for your organization or need help preparing your instance for AI, reach out to us! We’d love to chat.

Why Traditional Lead Scoring Falls Short (And How AI Can Fix It)

Lead scoring is one of those things that marketing ops teams set up, constantly maintain, and still lose sleep over.

The concept is simple. You assign points to leads based on who they are and what they do. 

Open an email? +5. Download a whitepaper? +10. VP title at an enterprise company? +15. Hit a threshold, and the lead gets passed to sales as an MQL.

It sounds clean on paper. But in practice, it’s a different story.

Today, we’re going to talk about why rules-based lead scoring struggles to capture real buying behavior, and how you can build an AI-powered scoring model (fine-tuned on your own data) that actually reflects what a good lead looks like for your business.

We’ll walk through the full technical setup, including code snippets you can adapt for your own implementation.

Let’s get into it.


What Lead Scoring Is (and What It’s Supposed to Do)

For those who need a refresher, lead scoring is a method for modeling lead engagement and fit. It’s how marketing tries to answer the question: “Is this person ready for a sales conversation?”

Most marketing automation platforms, like Marketo, support two dimensions of scoring:

Demographic scoring looks at who the lead is. Job title, company size, industry, and geography are the usual suspects. A Director at a 500-person SaaS company might score higher than an intern at a 10-person nonprofit, assuming you’re selling enterprise software.

Behavioral scoring looks at what the lead does. Email opens, link clicks, webinar attendance, page visits, form fills. Each action adds points, and the accumulation of those points is supposed to tell you how engaged someone is.

When a lead crosses a predefined threshold (say, 100 points), they become an MQL and get routed to sales.

The idea is solid, but the execution is where things break down.

Where Rules-Based Scoring Fails

Here’s the core problem: rules-based scoring treats every action in isolation. It can’t model the relationships between behaviors. And it definitely can’t account for the complex, nonlinear ways that real people actually buy.

Consider these scenarios:

A lead downloads three whitepapers in one day. Your scoring model adds +30 points and flags them as highly engaged. But maybe they’re a student doing research for a thesis. They’ll never buy anything.

Meanwhile, a VP visits your pricing page once, looks at a case study, and then goes quiet for two weeks. Your model barely notices them. But that VP just got budget approval and is about to reach out to your sales team.

Rules-based scoring can’t distinguish between these two leads because it doesn’t understand context. It just adds up numbers.

This leads to a few painful outcomes:

Low conversion rates on MQLs. Sales gets a pile of “qualified” leads that don’t actually convert. Over time, they stop trusting the scores entirely.

A strained marketing-sales relationship. Sales says the leads are bad. Marketing says sales isn’t following up properly. Nobody’s happy, and the finger-pointing goes nowhere.

Wasted time and budget. Your team spends hours tweaking point values (is a webinar worth 15 or 20 points?), but the fundamental limitation remains: A rules engine can’t learn patterns the way a model trained on real outcomes can.

If you’ve been in MOPs for a while, this probably sounds painfully familiar.

A Better Approach: AI-Based Lead Scoring

So what does AI-based lead scoring actually look like?

Instead of manually defining rules, you train a model on your own historical data. Specifically, you look at the leads you’ve already passed to sales over the last 3 to 6 months, and you identify which ones turned out to be great and which ones turned out to be duds.

Here’s the general process:

  1. Pull your Sales accepted (especially closed wons) and Sales rejected leads from the past 3-6 months. These are your “best” and “worst” examples.
  2. Gather their demographic data (title, company size, industry, etc.) and their full activity log from Marketo (every email click, page visit, form fill, and program status change that happened before they were passed to sales).
  3. Grade each lead on a scale of 1-10. Your closed-won leads with fast sales cycles and large deal sizes might be 9s and 10s. Closed-lost leads that wasted everyone’s time get 1s and 2s. Everything else falls in between.
  4. Fine-tune an LLM (like an OpenAI model) on this graded dataset. The model learns what patterns of demographics + behavior tend to produce high-scoring leads for your specific business.
  5. Deploy the model through an iPaaS solution that Marketo can call in real time whenever a lead’s profile or engagement changes.

The result is a scoring model that doesn’t just add up points. It understands that a pricing page visit from a Director at a mid-market SaaS company, combined with a webinar attendance three days earlier, is a fundamentally different signal than the same visit from someone with no other engagement. It picks up on the patterns that rules can’t.

Step-by-Step: Building Your Fine-Tuned Scoring Model

Let’s get technical. Here’s how to put this together.

Step 1: Gather Your Training Data from Marketo

You’ll need two things for each lead in your training set: their demographic profile and their activity history. Marketo’s REST API gives you both.

Pulling lead demographics:

Pulling the activity log:

For behavioral activity, you’d call the Get Lead Activities endpoint with the relevant activity type IDs (email opens, web page visits, form fills, and so on):

To get the nextPageToken, you first need to call the paging token endpoint:

Collect this data for all the leads in your training set. You’ll want a solid sample: aim for at least 100-200 leads if possible, split between your best and worst performers.

Step 2: Grade Your Leads

This part requires human judgment. Go through your leads and assign each one a grade from 1 to 10 based on actual outcomes.

Here’s a rough grading guide you can adapt:

  • 9-10: Closed-won, short sales cycle, high deal value. These are your dream leads.
  • 7-8: Closed-won but with a longer cycle or smaller deal. Still great.
  • 5-6: Reached opportunity stage but stalled or went dark. Had potential.
  • 3-4: Accepted by sales but disqualified quickly. Poor fit or timing.
  • 1-2: Closed-lost fast, never responded, or turned out to be a completely wrong persona.

Step 3: Format Your Training Data for Fine-Tuning

OpenAI’s fine-tuning API expects your data in a specific JSONL (JSON Lines) format. Each line is a conversation with a system prompt, a user message (containing the lead data), and an assistant response (the grade and reasoning).

Step 4: Fine-Tune Your OpenAI Model

With your training file ready, you can kick off the fine-tuning job:

The fine-tuning process typically takes anywhere from 15 minutes to a couple of hours, depending on the size of your dataset. Once it completes, you’ll get a custom model ID that you can use in API calls just like any other OpenAI model.

You can check the status of your job:

Deploying Your Model with an iPaaS Solution

Now for the fun part: making this work in real time.

The architecture looks like this:

  1. A lead’s engagement or demographic data changes in Marketo.
  2. Marketo fires a webhook to your iPaaS solution (n8n, Zapier, Workato, etc.).
  3. The iPaaS workflow pulls the lead’s full demographic data and activity log from Marketo’s API.
  4. The workflow sends that data to your fine-tuned OpenAI model.
  5. The model returns a score (1-10) and a reason.
  6. The iPaaS workflow writes the score and reason back to Marketo via the Leads API.

A Critical Technical Note

This is important:

Do not use a “Response to Webhook” node to send data back to Marketo.

Webhook responses have strict time limits (usually a few seconds). Your workflow needs time to make multiple API calls to Marketo, send data to OpenAI, and wait for a response from a reasoning model. That chain of operations can easily take 10-30 seconds, which will cause a webhook timeout.

Instead, treat the webhook as a one-way trigger. Let it fire and forget. Then, at the end of your iPaaS workflow, call the Marketo REST API Leads endpoint directly to write the score and reason back to the lead record.

Here’s what the write-back looks like:

The iPaaS Workflow (n8n Example)

If you’re building this in n8n, your workflow will look something like this:

Node 1: Webhook Trigger Receives the lead ID from Marketo when a score-relevant change occurs.

Node 2: Get Marketo Access Token

Node 3: Get Lead Demographics

Node 4: Get Paging Token

Node 5: Get Lead Activities

Node 6: Call Fine-Tuned OpenAI Model

Node 7: Update Lead in Marketo (via API, NOT webhook response)

What Sales Actually Sees

This is where things get really interesting for your sales team.

Instead of just seeing a number (Lead Score: 87… out of what? Based on what?), reps now see two custom fields on the lead record:

  • AI Lead Score: 8/10
  • AI Score Reason: “Senior Director title at a mid-market SaaS company (450 employees) in the target industry. Visited the pricing page twice in 7 days, attended a product webinar, and downloaded the ROI calculator. Engagement pattern closely matches recent closed-won deals with similar company profiles.”

That’s a world of difference. A sales rep reading that reason knows exactly why this lead matters and how to approach the conversation. They can reference the webinar, mention the ROI calculator, and speak to the specific use case that likely drove the interest.

Why a Fine-Tuned Model Beats a Generic One

You might be wondering: why go through the trouble of fine-tuning? Can’t you just send lead data to GPT-4 with a good prompt?

You could, and it would probably be better than rules-based scoring. But a fine-tuned model has some significant advantages:

It’s calibrated to your business. A generic model doesn’t know that leads from the financial services industry close 3x faster for your company, or that Directors convert better than VPs in your space. Your fine-tuned model learned these patterns from your actual data.

It’s more consistent. Fine-tuned models produce more predictable outputs because they’ve internalized your scoring rubric. A generic model with a long prompt can drift or interpret things differently across calls.

It’s faster and cheaper. Fine-tuned models on smaller base models (like gpt-4o-mini) are significantly cheaper per call than sending large prompts to a full-size model. When you’re scoring leads in real time, cost per API call matters.

It improves over time. Every quarter, you can pull new closed-won and closed-lost data, add it to your training set, and re-fine-tune. The model gets smarter as your business evolves.

Keeping the Model Fresh

One last thing worth mentioning. Your fine-tuned model is only as good as the data it was trained on. Markets shift, your product evolves, and the profile of your best customers can change.

We recommend re-training your model every quarter. Pull the latest 3-6 months of closed deals, re-grade them, and run another fine-tuning job. It’s not a huge lift once you have the pipeline set up, and it ensures your scoring stays relevant.

You can even compare model versions by running both the old and new models on the same set of recent leads and seeing which one better predicts actual outcomes. Think of it as A/B testing for your scoring model.


Traditional lead scoring served us well for a long time. But buyer behavior has gotten more complex, and a rules engine that adds up points just can’t keep pace.

By fine-tuning an AI model on your own historical data, you get a scoring system that actually understands what a good lead looks like for your specific business.

And by deploying it through an iPaaS solution connected to Marketo, you can score leads in real time, complete with a human-readable explanation that sales teams will actually trust and use.

If you want help setting up AI-powered lead scoring for your Marketo instance, or if you’re curious about what else AI can do for your marketing ops, reach out to us here.

We’d love to help you get started.

How to Send The Right Content to Every Lead Using AI and Marketo

Traditional nurture campaigns pose a fundamental challenge to marketers.

They send the same email to every person in a segment, regardless of:

  • Where that person actually is in their buying journey
  • What content they’ve already consumed
  • What topics they care about most

While you can improve content relevance with good segmentation and branching logic, even the most sophisticated Marketo nurture programs are making educated guesses at scale. You’re grouping people into buckets and hoping the content resonates.

But what if you didn’t have to guess at all?

At Revenue Pulse, we’ve been building what we call “AI Nurture” (or “AI Next Best Offer”) for our clients. 

It’s a workflow where Marketo triggers an AI-powered process that reads each lead’s demographic and behavioral data, then picks the single best piece of content to send them. From there, it writes a personalized subject line and email body and returns everything to Marketo, ready to send.

The result is true one-to-one email nurturing. Every lead gets a unique email, crafted specifically for them.

In this article, we’ll walk you through the full architecture of this workflow and explain how each piece works. We’ll also be including code snippets you can reference when building your own version.

Let’s jump right in!


Why Traditional Nurtures Fall Short

If you’ve spent any time in Marketo, you’ve probably built an engagement program with multiple streams. You set up cadences, add content, and maybe even use transition rules to move people between streams based on score or behavior.

It works, but there are some real challenges we wanted to tackle. Here are the 3 big ones:

Everyone in a stream gets the same email. A VP of Marketing and a junior coordinator in the same stream will receive identical content, even though their pain points and decision-making authority are completely different.

Content selection is static. You decided the order of emails weeks or months ago. The nurture doesn’t adapt to real-time signals; it just follows the sequence you built.

Scaling personalization is painful. To get more targeted, you need more streams, more segmentations, more content variants. It quickly becomes unmanageable. We’ve seen instances with dozens of streams that still don’t feel personal to the recipient.

AI Nurture solves all of these problems by making content selection dynamic and individual, not static and segment-based.

The Full Architecture

Here’s how the entire flow works at a high level:

  1. Marketo fires a webhook to an iPaaS workflow (we typically use n8n, but Workato, Zapier, or any other iPaaS will work).
  2. The workflow pulls the lead’s data from Marketo, including demographics (title, industry, company size) and behavioral activity (emails opened, pages visited, forms filled, content downloaded).
  3. A content selection model receives this data along with a RAG knowledge base containing your full content library. The model picks the single best piece of content for that specific lead.
  4. A subject line model writes a personalized subject line, using your top and worst-performing email subject lines from the past month as reference material.
  5. An email body model writes personalized HTML email copy, also trained on your recent email performance data.
  6. The workflow writes the results back to Marketo into custom fields: AI Email Subject, AI Email Body (HTML), and AI Email Body Text.
  7. Marketo sends the email, using Velocity scripting to render the HTML content from those fields.

Let’s break down each step.

Step 1: The Webhook Trigger

In Marketo, you set up a Smart Campaign that fires a webhook when a lead qualifies for the nurture. The webhook sends the lead’s ID (or email) to your iPaaS workflow.

Your webhook URL might look something like:

On the iPaaS side, this triggers the workflow. The first node receives the lead ID and kicks off the data retrieval process.

Step 2: Pull Lead Data from Marketo

The workflow calls the Marketo REST API to get two things: the lead’s demographic profile and their activity history.

For demographics, you’d call the Get Lead by ID endpoint:

For behavioral activity, you’d call the Get Lead Activities endpoint with the relevant activity type IDs (email opens, web page visits, form fills, and so on):

The workflow then compiles this into a structured payload. Here’s an example of what that compiled data might look like:

The contentHistory array is critical. It tells the AI what this person has already received, so it won’t recommend the same content twice.

Step 3: The Content Selection Model (RAG)

This is the core of the system. You send the lead’s compiled data to an LLM that has access to a RAG (Retrieval-Augmented Generation) knowledge base containing your content library.

Building the Content Library

Your content library is a structured document (or set of documents) that describes every piece of content your company wants to promote. Each entry should include:

  • Title: The name of the content piece
  • Type: eBook, webinar recording, blog post, case study, etc.
  • Summary: A 2-3 sentence description of what it covers
  • Key Takeaways: The main points someone will learn
  • Target Audience: Who this content is best suited for (by role, seniority, industry, buying stage)
  • URL/Link: Where the content lives
  • Tags: Topics covered (e.g., “budgeting”, “AI”, “data quality”, “attribution”)

Here’s an example of what one entry might look like:

Your full library might have 50 to 200+ entries. The RAG system indexes this content so the model can search and retrieve relevant options quickly.

The Content Selection Prompt

The system prompt for your content selection model might look something like this:

The model receives this system prompt along with the lead data and the content library (via RAG), then returns its pick.

Step 4: The Subject Line Writer

Once you know what content to promote, you need a compelling subject line. This is where the second model comes in.

What makes this model special is its knowledge base: you feed it your organization’s top-performing and worst-performing email subject lines from the past 30 days (or whatever timeframe makes sense). You can pull this data from Marketo’s Email Performance Report or via the API.

The knowledge base might look like this:

The system prompt for this model:

Step 5: The Email Body Writer

The third model writes the actual email body. It uses the same performance knowledge base as the subject line writer, but this time it’s looking at full email copy patterns rather than just subject lines.

This model returns HTML, which is important because Marketo will render it inside your email template.

The system prompt:

Step 6: Write Results Back to Marketo

Once all three models have returned their results, the workflow writes the data back to Marketo using the Update Lead endpoint:

You’ll need three custom fields in Marketo to hold this data:

  • aiEmailSubject (String)
  • aiEmailBodyHtml (Text, large enough to hold HTML content)
  • aiEmailBodyText (Text)

These fields get overwritten every time the workflow runs for a given lead, so you always have the freshest AI-generated content ready to send.

Step 7: Rendering with Velocity Scripting

Here’s where it all comes together inside Marketo.

Your email template contains Velocity script blocks that pull the AI-generated content from the lead’s fields and render them.

For the subject line, you simply use the token:

For the HTML email body, you need Velocity scripting to safely render the HTML. In your email template, you’d add something like:

This script checks if the AI body field has content. If it does, it renders the HTML directly. If the field is empty for some reason (maybe the workflow failed or the lead was added to the campaign before the AI could process them), it falls back to a generic message.

For the text version of the email (used by email clients that don’t render HTML), you’d use:

Important note on the HTML version: Because the AI returns HTML stored in a Marketo field, and Velocity renders it within your email template, you want to make sure the AI is only generating simple, inline-styled HTML. No external CSS, no JavaScript, no complex structures. Simple <p>, <a>, <strong>, and <br> tags with inline styles are your safest bet. Most email clients are picky about what they’ll render, so keeping it simple is both a technical and deliverability best practice.

What This Looks Like in Practice

Let’s walk through a quick example (We’re using a completely made-up person and company as a placeholder for this).

Lead: Sarah Chen, Director of Marketing at TechCorp (500-employee software company). Lead score: 47. Recently visited a blog post about AI agents, downloaded a 2026 planning checklist, and opened last month’s newsletter about budgeting.

What traditional nurture would do: Send Sarah the next email in Stream B, which is the same case study that every other lead in that stream also receives.

What AI Nurture does:

  1. Pulls Sarah’s full profile and activity history
  2. Recognizes she’s mid-funnel (decent lead score, active engagement), interested in AI and planning topics, and hasn’t yet seen the “Where Does AI Fit Into Your 2026 Budget?” article
  3. Selects that article as the best next piece of content
  4. Writes a subject line modeled after the organization’s best-performing emails: “Your 2026 plan is missing this piece”
  5. Writes a personalized email body that connects the content to her role as a marketing director during planning season
  6. Returns everything to Marketo, where the email is sent within minutes

Sarah gets an email that feels like someone on your team wrote it specifically for her. Because, in a way, something did.

A Few Things to Keep in Mind

Start with a solid content library. The AI is only as good as the options you give it. If your content library has 10 blog posts and nothing else, the recommendations will get repetitive fast. Aim for a diverse library that covers different topics, formats, buying stages, and audience segments.

Update your performance data regularly. The subject line and body writer models learn from your recent email performance. If you’re feeding them data from six months ago, they’re optimizing for patterns that may no longer work. We recommend refreshing this data monthly.

Build in fallbacks. Things will occasionally fail. An API times out, a model returns unexpected output, a field doesn’t get populated. Your Velocity scripts should always have fallback content, and your Smart Campaign should include a “wait” step to give the workflow time to complete before the email sends.

Test and iterate. Run A/B tests comparing AI Nurture emails against your traditional nurture campaigns. Track open rates, click rates, and most importantly, progression through the funnel. In our experience, the AI-generated emails consistently outperform static nurture content because they’re relevant to each recipient.

Watch your API usage. Each lead that goes through this workflow makes multiple API calls to both Marketo and your LLM provider. Be mindful of rate limits on both sides, and consider batching if you’re processing large volumes. Most iPaaS solutions let you add delays or queue management to stay within limits.

Wrapping Up

AI Nurture isn’t a futuristic concept. It’s something you can build and run today with tools that already exist: Marketo, an iPaaS like n8n or Workato, and any major LLM with RAG capabilities.

The shift it represents is significant. Instead of building nurture programs that treat segments as monoliths, you’re creating a system that treats every lead as an individual. It knows what they’ve done, understands where they are in their journey, picks the right content, and writes the email in a style that’s proven to work for your audience.

It’s one-to-one marketing at scale, and it’s not as far out of reach as you might think!

If you’re interested in building something like this for your organization, or if you want to see how Otto (our AI teammate for MOPs) handles nurture workflows, we’d love to chat. 

Reach out to us here to book some time with our team.

How to Manage Your Marketing Automation Platform Migration

The decision to migrate to a new marketing automation platform is one to treat with care. You might be looking to solve the pain points of your current platform, gain more advanced features to support your growth, or see more value for money by focusing on specific capabilities.

Why it’s a heavy lift:

Moving to a new marketing automation platform can get strong results and revitalize how your marketing team performs, but this isn’t a project to underestimate. Migrating to a new platform is a technical, resource-intensive effort that requires careful planning to yield results with minimal disruption.

What’s in this article for you?

If your CMO or Marketing VP is pursuing a new marketing automation platform, this article is for you. You’ll learn how to:

➡️ Set realistic expectations on timelines and performance.

➡️ Advocate for the processes.

➡️ Understand how to execute the project correctly.


Size Up the Task

Before you get off the ground with a platform migration, your marketing operations team needs to be clear on the demands of the project. Leadership might assume that features shared between platforms will translate identically from one to the next, and therefore expect a much faster turnaround than what’s feasible.

There are a few points of guidance you can give to address the project scope.

👉 Migrating to a new platform means rebuilding your marketing automation system from the ground up. This means you can’t resume with your new platform exactly where you left off with the previous one.

👉 Present how key features differ between platforms to leadership and your team.

👉 Determine the pieces you can migrate cleanly versus infrastructure to build anew, similar processes versus functions the team needs to relearn.

Before your team starts building any infrastructure, Marketing’s evaluation should deepen until they’re able to set priorities for the migration.

Some of the key questions that should be answered at the initial risk assessment, include:

  • What assets and programs are critical to migrate?
  • Which prior integrations will you need to reestablish?
  • How deeply will you need to clean your database?
  • Without historical data on your new platform, how will you interpret the first few months of reporting?

Time It Right

Naturally, a significant project like this will have productivity consequences for the team.

You’ll want to budget 12-16 weeks to get your assets and database from A to B, accounting for all stakeholder approvals.

While your team handles the migration and gets to grips with the new system, advocate for this to be a cool-down period for campaigns, events, and other intensive projects like rebranding or moving to a new website.

After all, Marketing will be best set up to succeed by ramping up to normal only when they’ve mastered the new system.

To make that happen, highlight the need for a dedicated team to help with training and project support. Whether your experts come from SOPs, MOPs, or IT, they need hours in the week scoped out in advance to assist.

Continuity is another key thing to account for.

Base the timeline for your migration on the contract with your current vendor. A crossover period between the two platforms, where you gradually dim the switch on your current system, is essential to prevent from going dark. To stay up and running, suggest to leadership that you begin the migration with at least a month left on your outstanding contract.

Ultimately, your planning should conclude with key stakeholders all on the same page about the work to come. Encourage your team to contribute to a project management resource that breaks down tasks and responsibilities, dependencies, tactical elements, and required buy-in.

This, along with agreed-upon and documented definitions for key terms and processes (e.g. lifecycle modelling, lead qualification criteria), is crucial for your team members to work in sync with one another during the migration.

See It Through

Once your migration’s in motion, effective project management is vital to ongoing success.

A delay in one area of the migration has consequences for other moving parts, so encourage your team to participate in weekly sync calls, sprints, and targeted meetings to share status updates and proactively keep on top of risks.

As the project progresses, all of the stakeholders involved in the migration are going to be learning about how your new platform works; to help with onboarding and knowledge transfer, have them contribute to a resource that outlines how all new processes and functionalities work.

A platform migration is a project made of many different factors—from timelines to training, priorities to vendor contracts—and the closer your team collaborates to understand the task at hand, the better the odds are you’ll put together a plan that works.

No matter the size of your organization, migrating to a new marketing automation system is a complex and resource-intensive process. For any support you need with planning or executing a platform migration, we’re here to help.

Follow Revenue Pulse on LinkedIn and join the conversation.